[Elasticsearch] Elasticsearch Python Client Connecting
파이썬에서 엘라스틱서치 클라이언트 연결하는 방법
파이썬 엘라스틱서치 클라이언트
파이썬에서 엘라스틱서치 클라이언트를 사용하는 방법을 알아보겠습니다.
라이브러리 설치
pip install elasticsearch
- pip 명령어를 이용해 엘라스틱서치 라이브러리를 다운로드 받습니다.
파이썬 연결 확인
from elasticsearch import Elasticsearch

# Password for the 'elastic' user generated by Elasticsearch
ELASTIC_PASSWORD = "yourpassword"

# Create the client instance
client = Elasticsearch(
    "https://localhost:9200",
    ca_certs="/Users/squareyun/Documents/utility/elasticsearch-8.1.0/config/certs/http_ca.crt",
    basic_auth=("elastic", ELASTIC_PASSWORD)
)

# Successful response!
print(client.info())
# {'name': 'instance-0000000000', 'cluster_name': ...}
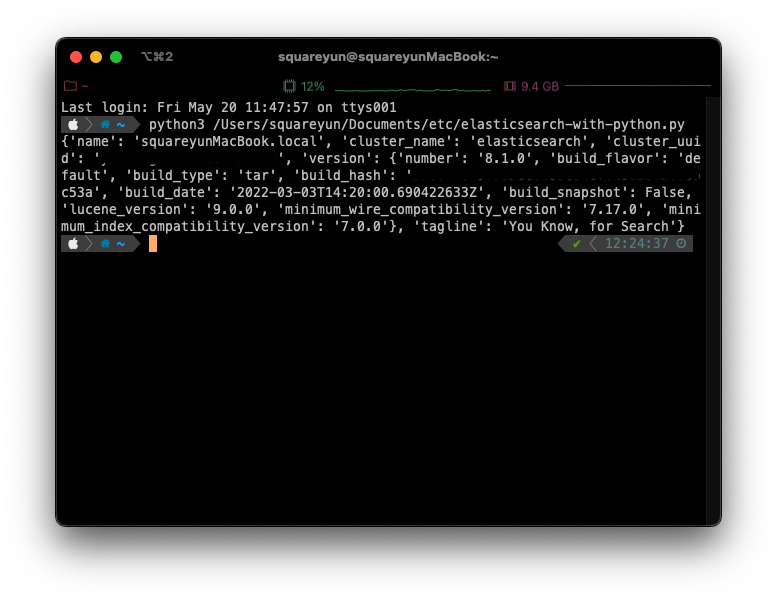
- 위와 동일하게 py 파일을 작성하여 실행시켜 보세요.
- ca_certs에서 http 인증서가 있는 경로를 올바르게 작성해야 합니다.
실행 결과
에러 종류
No such file or directory
lastic_transport.TlsError: TLS error caused by: TlsError(TLS error caused by: SSLError([Errno 2] No such file or directory))
- ca_certs에 입력한 인증서 경로가 잘못되었다는 에러입니다.
- 파일 위치를 다시 확인해주시고, 특히 윈도우 환경에서는 경로 작성에 유의하세요.
self signed certificate in certificate chain
curl: (60) SSL certificate problem: self signed certificate in certificate chain
- 저의 경우는 인증서에 문제가 있을 때 발생하였습니다.
- 정확한 인증서가 맞는지 재확인 해주시고, 인증서 파일이 없다면 이 페이지를 통해 인증서를 발급하세요.
⚠️ 서버가 외부에 있는 경우 ⚠️
- 엘라스틱서치 서버가 외부에 있는 경우 인증서 파일을 연결해도 실행이 되지 않습니다.
- 외부 클라이언트에서 엘라스틱서치 서버로 접근할 때 http.p12 인증서가 기관이 인증하지 않은 인증서이므로 외부에서는 신뢰할 수 없습니다.
- 외부 클라이언트에서 접근하기 위해서는
서버 IP를 DNS로 등록,도메인 정보가 포함되어있는 CA인증서가 필요합니다. - 추가적인 설명은 이 블로그를 참고하세요.
인덱스 생성 및 조회
from datetime import datetime
from elasticsearch import Elasticsearch

ELASTIC_PASSWORD = "yourpassword"

client = Elasticsearch(
    "https://localhost:9200",
    ca_certs="/Users/squareyun/Documents/utility/elasticsearch-8.1.0/config/certs/http_ca.crt",
    basic_auth=("elastic", ELASTIC_PASSWORD)
)

# doc 객체 생성
doc = {
    'author': 'kimchy',
    'text': 'Elasticsearch: cool. bonsai cool.',
    'timestamp': datetime.now(),
}

# 인덱스 생성
resp = client.index(index="test-index", id=1, document=doc)
print(resp['result'])

# 인덱스 조회
resp = client.get(index="test-index", id=1)
print(resp['_source'])

client.indices.refresh(index="test-index")

resp = client.search(index="test-index", query={"match_all": {}})
print("Got %d Hits:" % resp['hits']['total']['value'])
for hit in resp['hits']['hits']:
    print("%(timestamp)s %(author)s: %(text)s" % hit["_source"])
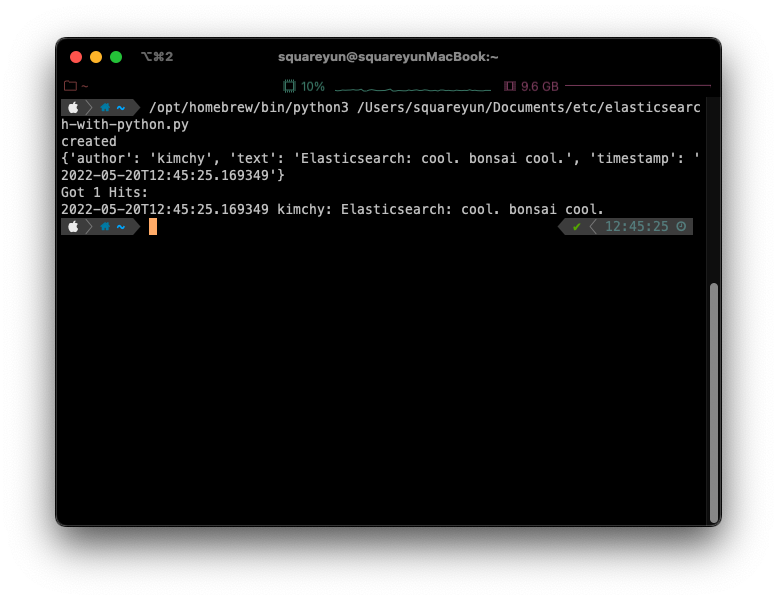
- 인덱스를 생성하고 조회하는 예제입니다.
- document를 생성할 때 시간 정보를 넣기 위해 datetime 라이브러리를 사용합니다.
실행 결과
더 읽을거리
- https://www.elastic.co/guide/en/elasticsearch/client/python-api/8.2/connecting.html
- https://elasticsearch-py.readthedocs.io/en/v8.2.0/
- https://www.lesstif.com/gitbook/https-ssl-curl-web-browser-16744456.html